Showing posts with label Google apps. Show all posts

Saturday, March 13, 2021

An Easy Way to See Students' Typed Answers in Google Docs

 I know I'm not the only one to use this method, but here's how I create highlighted answer blanks in Google Docs. This makes it easy to see their answers when you assign it as "Make a copy for each student" in Google Classroom.

Here's how it looks when they type in the box:


To create that box, I just insert a 1x1 table and then fill it with a light color. The animated GIF below shows the process. 

Once you make one answer blank like this, you can select it, copy it and then paste it in each question in your Doc.


Friday, March 27, 2020

Creating Simple Google Sites to Keep in Touch With Students

When schools were closed in Michigan some elementary teachers in my district wanted to keep in touch with students using a website. I made these two short videos to help them get started. They are meant for beginners. Also, please understand they were done quickly and are quite informal.

I'm happy to say they helped teachers create sites who had never made one before. I got some sincere thanks for the effort.

This first one shows how to start a Site and add text, images and links.

This second video shows how to publish the site the first time and how to find the link so others can view it. Note that you have to publish the site again each time you edit it.

Tuesday, February 18, 2020

Recording Audio and Adding It to Your Google Slides Presentation

It's a simple process to add audio to Google Slides presentations now. Students can use the feature for many things, including their narration on each slide. Here's a simple example I made to show how this might work.

While it's easy to add audio, there are at least three steps that students might need help with, especially when using Chromebooks. I made a document (at the link below) that will walk them through the process. It is intended to be useful for a variety of different classes and projects. 

Those three things they might need some help with (or reminders for) are:

  • How can you easily record the audio for the slides?
  • Don't forget you have to upload those audio files to Google Drive.
  • And if you share the Slides presentation, you also have to share those audio files with the same people.
All of those details and more are addressed in this one-page document. Feel free to share that document with others and edit as you like. Please keep the link to my blog at the top.

These tutorials are linked within the document:
  • A video tutorial for using Bear Audio Tool to record the files for each slide
  • A video with tips for how to add the audio files and be sure they play how you want them to (including how to upload them to Drive)
  • A brief explanation in the document of how to easily share the audio files so when someone presents them, they will play.

Saturday, December 7, 2019

Holiday Classroom Game and Creativity Activity

Here's a free resource that can be used for a few fun, creative activities in the classroom. At its heart, it's just a way to generate a random pair of words that students use to write a holiday themed haiku.

I'll list a few ways I've used similar activities in class, along with a brief explanation of each. Some will link to previous posts with more details.

First, click here to get your copy of the Google Slides presentation. It will open in your Google Drive.

Generating a Prompt
No matter which way you choose to use the activity, you will be generating a random prompt and students will use it to write a haiku. To generate the prompt, open the presentation so the class can see slide 2. Don't present it. Just display it as shown below. Draw two random words from behind the gift. You can grab them and drag them by the circle at the far right of the screen.


In the above example, the two words drawn are "gift" and "peace".

Students will then create a haiku using the two random words. You can require them to use the exact words, any variation (such as singular or plural) or maybe they just have to use the general idea of the word in their haiku. Of course, if you're using it for the holidays, that will be an implied general theme for all haikus they write. How generally or specifically you want to make this is up to you, but be sure to explain your requirements before they start any of the activities explained below.

Note that you can change the words too if you want. Just drag the words off to the side of the slide, so you can see the word. Double click on the word and it should let you delete the text and replace it with whatever you want. If it's a long word, you might have to stretch the text box to make it fit. Then drag the word back under the present, so it can be randomly selected during the activity.

A Class Writing Prompt
This is the easiest way to use the activity. The teacher can draw two random words from behind the gift. Every student in the class uses those two words (and any other requirements the teacher provides) to write their own haikus.

The writing can be done in class or as an assignment outside of class. Once the teacher has time to look at the submitted haikus, she can choose up to five of her favorites and type them on the A - E spaces  of that slide. At any time after that, the class can vote on their favorite using a poll/quiz application like Socrative or Kahoot, or they could just use a show of hands or submit a vote on a paper slip.

A "Game Show" With a Few Contestants
I used to do all my creativity games this way. It is a challenging exercise for the contestants, but if you have a creative group it can be fun. In this case, 3 - 5 contestants sit at the front of the class. The teacher draws two random words from behind the gift to form the prompt. The contestants each write a haiku using those words and the teacher's requirements. They should have 3 - 5 minutes to write it.

When they are finished, the haikus are read aloud and typed into the spaces A - E (or just summarized). The class votes on their favorite using a poll/quiz application or some other non-digital method. Each contestant gets points equal to the number of votes they receive. Points can be kept on the Score slide. Usually we have time for about three rounds when we do games like this.

If you don't want to give such a strict time limit, you could combine this format with the above activity. The contestants could write their haikus outside of class and turn them in the next day for the vote.

See this post for more details and tips for running these "game show" style creativity games.

A Game Played in Small Groups
More recently I started running these creativity games in small groups. In this case, you can do a sample round with the whole class, just so they see how to play. Then have them work in groups of 3 or 4 students. Each group will have one device to access their copy of the Holiday Haiku slide presentation.

They will play multiple rounds. Each round one student will be the judge. He or she will randomly draw out two words from behind the gift and show the other group members. Everyone other than the judge gets a limited amount of time to write a haiku that uses the two words and follows any other requirements the teacher has given.

When finished, the haikus are gathered and shuffled up. One student reads each of them to the judge. The judge chooses one as his or her favorite. The player who writes it gets a point.

Now the next player becomes the judge and another round is played. Rounds are repeated until each player has been the judge once. The player or players with the most points wins.

See this post for more details about playing creativity games in groups.

Reflection
No matter how I use these activities in class, I like to seal the learning by adding some reflection.  Here's the reflection sheet I used with one class after doing a similar small group version of a creativity game. Depending on how you presented the material and what the lesson content was, you will probably want to modify the questions somewhat.


Fun Holiday Tech Project With Google Slides

Students can use this process to make animated holiday cards for family members or just for fun. Everything can be created using Google Slides.

I'll give a brief overview of the process below. If you want to see my usual directions with video tutorials (not just for holiday animations), you can find everything you need to introduce it in class for $2 on Teachers Pay Teachers.

Here's a summary of the process:

1)  Make a Plan - Students really need to decide in advance what shapes they'll use and what's going to happen in the animation. Once they get going on later steps, it's hard to make a big change. In my example above, I knew I wanted the ornaments to float up on the tree and some words to appear.

2)  Create the Shapes - When you first use this process, it's easiest to make everything and have it be part of the first frame. Just start a new Google Slides presentation and start building.

I like to have students create their art using basic shapes in Google Slides (instead of looking for clip art online). In my example, I did use a graphic from Pixabay for the border. I created the other elements myself. Here's how my first frame looked*:


3)  Create the Animation - This is the heart of the process. You duplicate the current frame, then move the animated elements on that frame just slightly. To duplicate the frame, click on it in the left panel and (if you're on a Chromebook or PC) press ctrl-d. (You can also right click on it and select Duplicate slide.)


So in my example, I duplicated the first slide. Then on the second (new) slide I moved some of those ornaments on the floor up, just a centimeter or so.

You continue that process of duplicating the slide and moving the objects until all the animation is complete. As I said above, it's hard to fix a mistake once you get going with this. That's why a plan is important. Here are some other tips:
  • I frequently click through the slides to preview my animation to make sure the objects are moving like I want them to. Sometimes they're not and I have to delete some frames to do a section over.
  • Some frames should display a little longer, so I duplicate those a few times without changing anything. For example, I made several copies of the first frame, the last frame and that frame where the star lands on top of the tree. I wanted a pause at those points.
  • You can animate text the same way. I made the text box, then had one word at a time appear. I've seen some people who like to have each letter appear one by one. It's up to you. When you do text, you especially will want to duplicate some frames multiple times to pause it at times. Otherwise the words go by too quickly. 
Click here to see all 40+ slides of my animation in slideshow format.

4)  Publish the Slides - You can publish the animation so it plays as a full page in a browser tab. Click here to see how this would look.

You can publish a presentation by going to the File menu and selecting Publish to the web. This window will open up. Check the boxes as shown, then click Publish.


That will make a link that appears as shown below. Copy that, as it says, by pressing ctrl-c. That's the link (more or less) that you need to share with others so they can see your animation. But don't share it yet! See the next step.

5)  Share the Link - You can paste that link in an email, add it to a website or share it any other way you like. Just remember one important thing. At the end of the link you'll see a 3000 when you paste it. Change that 3000 to a smaller number such as 100 or 150. 
I usually paste it into the address bar in a new tab and then change the number, so I can play the animation and see how it will look. You can keep doing this, adjusting the number how you want, with larger numbers making it play slower. Experiment with a number that works how you like it to. Once I've got a good number, I paste the link again, change the number, copy it again, then share that link.

6)  You can also turn it into an animated GIF! - I use the site Tall Tweets to do this. They have something called Tall Tweets Studio now, but I suggest scrolling down and clicking the Classic version. I also recommend teachers make copies of students' presentations and convert those for them, since there are some privacy and terms of service matters involved with granting access to Google Drive for this process. Since it has some other settings to experiment with, this option is only recommended for older students.

Again, the above 6 steps are a brief overview of the process. See my published lesson on Teachers Pay Teachers for a "ready to assign" document with everything students need. You'll want to show them my examples from this post, though, since the general directions are not just for holiday animations.


*Actually, if you want some behind the scenes info on my animation, I used a slightly different process. I worked backward to build my animation, because I wanted to start with the final image of the decorated tree. I did this just to be sure I had enough bulbs and that they'd look right. 

This is an advanced technique and I'd only recommend it to students who have made a few animations as described above. Besides thinking backwards, the only real change is that after duplicating a slide, I dragged it above the slide I just duplicated. So instead of duplicating slide 10 and moving the objects on frame 11, for example, I was always duplicating frame 1, then dragging the new frame up so it became frame 1. Then I moved the objects (in a backwards direction) on frame 1. This is harder to describe than it is to do, but I don't recommend it for beginners.

Saturday, November 23, 2019

Chromebook Activity for Kindergarten

The kindergarten teachers in my district asked me to do some very simple activities that would introduce their students to Chromebooks. Below you'll find the link to the one I've been staring out with this year.

The goal of the activity is to let students practice using the keys and touchpad and to show them the joy of creating with technology. See the notes below about how I set it up and get started in the class with it.

Click here to get a copy of the Google Slides presentation I use for the activity.

It is simply a series of images with clip art objects (all from Pixabay.com) that the students can move around to "tell their story". Every class I've used this with has greatly enjoyed it and the teachers thank me for sharing it. It takes about 30 - 45 minutes of class time.

Setting Up the Activity

  • We use a generic Google account with a short username for many early elementary activities. I and a classroom helper log onto all the Chromebooks using that account. 
  • As the admin for our Google domain, I set that account up so the Chromebooks will open to our elementary "launch page". If you don't have these options, talk to the person who manages your Google domain to have it set up.
  • On that launch page, I post a simple graphic (like a sun in this case) with a link that will force a copy of the Google Slides presentation. It's important that the link will open as a copy (like my link does above). This helpful post from Kasey Bell shows how to get the link you will need for your slideshow.
  • Usually I and the class helper sign into all the Chromebooks when the students are at lunch or recess. Sometimes we do it during some other activity that has them away from their desks.

Introducing It to the Students

  • I prefer to have students sitting on the floor at the board when I first talk to them. If they're at their seats with the Chromebooks set up, I make a point that they have to know when to listen and when to use the technology. The students are always good about this! Of course, I'm the guest speaker, so I always get my free 5 - 15 minutes of their undivided attention!
  • I tell students that I enjoy using my iPad and Chromebook to play games, but in school I can't use them to play. Instead they should be used for learning and making. This is so important, as it's tempting to use the tech as a plaything during less focused time at that early age. "Just get on Starfall or ABCYa," I often hear. I am so grateful for the chance to plant seeds early on about the appropriate use of tech in school.
  • Using the teacher's computer and projecting on the board, I show them exactly how they will click the icon on the launch page to get a copy of their presentation. I show them that the computer does some thinking time after I click "make a copy", so they shouldn't keep clicking the link. 
  • I show them how they can add their name to the first page, so we will know who made the stories. I also let the teacher and any class helper know most students will need some help at this point double-clicking in the text box. 
  • I model how they can click to the next slide using the thumbnail images on the left. 
  • On the first page with the clip art, I show the students how to select it and move it to where we want it. There's the option of dragging it, but that is hard for some students (and adults) on a touchpad. I also show them how they can move it with arrow keys. It's helpful to have a Chromebook handy too, so they can see where those keys are or how I'd use the touchpad. 
  • We talk a little about how the image can be arranged to make a story. They like the idea that maybe the crab was holding the umbrella and blew into the sky for the beach scene, for example.
  • As a challenge, I show them how they can make a shape bigger or smaller by dragging the handles. I just like to plant this seed and see later who figures it out.
  • I then review the directions to get started then I set them loose.
As I mentioned, we usually have a helper in the class and the teacher. With me as well, a class of 25 or so students is fairly easy to manage. Some students definitely will struggle at first, but they do quite well once they realize they can use the arrow keys. 

There are plenty of things that can go wrong as they try to use the touchpad. Here are some common ones:
  • They end up swiping with two fingers and go back to the previous page. Just click the forward button and their slideshow will load.
  • They accidentally right click and open the right click menu. Just press the esc key. Show them clearly so they remember how to solve this themselves the next time.
  • They might double click an object, putting it in crop mode. One student had a good laugh when he cropped the kids' heads off on one slide and I was a little surprised how he did it myself at first! If this happens, just double click again if necessary and slide the crop handles so the full image displays correctly.
  • Remember the goal is to give them practice and to let them create. I really have no expectations for how they make their images look. 
Getting Access to the Stories
When students are working more independently, I sign in on one Chromebook using that same generic login. I go to Google Drive, create a new folder and then drag all the newly created slideshows into it. 

For whatever reason, there are always several more than I'd expect based on the size of the class. I'm sure some students start over a couple times when we don't realize and maybe creating all those copies at about the same time cause an odd error. All the extra copies can be spotted pretty easily (since they usually do not have a name on the first slide), so they're easily disregarded. 

I then share that folder with the teacher's Google account so she has access to the students' stories.

Using the name on the first slide, it's fairly easy to see who made each one just by browsing the thumbnails on the teacher computer. Sometimes we have enough time in class to show some stories, which is always fun for the class. Students who successfully stretched the images to large proportions become quite popular.

I hope you and your students also have as much fun with this activity as we have!

Sunday, November 10, 2019

Practice Making Comics with Google Slides

For over five years I've been teaching students and teachers how to make comics with Google Slides. We still use the process in my district and students still love the creative possibilities.

Recently I started introducing it in a new, interactive way that has worked well. It will allow you to just assign it and let students learn and practice right in the one presentation. It's basically a hyperdoc created in Google Slides.

Click here to get your own copy of the Google Slides presentation.

Some notes:
  • The easiest way to assign this would be through Google Classroom, with the option to make a copy for each student.
  • This is written on the first slide, but remind students not to click Present to go through the slideshow. They need to keep it in edit mode so they can do the practice on the later slides.
  • The final slide tells them to download it as a PDF and turn it in through Classroom. I like them to get the practice of downloading as a PDF, but you can change that if it's not a priority for your class.
  • We use this presentation as the first step in a comic creation project. You might have a specific project in mind or you could introduce them to the process just so they have it as a creative option for any project in the future.
  • Usually after students learn the process, I show them a tutorial like this one so they can use the Google Slides app to take photos on a phone or tablet.
If you like this simple, self-contained introduction to comics, please consider purchasing one of my inexpensive tech activities on Teachers Pay Teachers:

Monday, January 21, 2019

Beyond Slideshows - Four Alternate Options to Show Off the Learning

In my job in a K - 12 district I am always looking for simple, quick ways for students to show what they've learned. We use Google Apps and Chromebooks in our classrooms.

Recently I updated some resources for our teachers and put everything on one website. I made a public version at the link below. All of the projects on it have shown up on this blog in one form or another, but I hope even my regular readers will find this single location helpful.

These projects range from easy enough for early elementary to something middle school students can create. All of them can also be extended to final products appropriate for high school students.

With each project on the site I include:

  • At least one example of the final product
  • A video tutorial of how to create it
  • A document of directions that a teacher can edit and distribute to the class through Google Classroom - This document also includes links to the example(s) and the tutorial.
  • Suggestions for extending the projects
Here's the link to the site. If you find it useful, please share it with others and let me know what you think of it.

Saturday, December 1, 2018

A Simple, Powerful Reflection Activity with Google Drawings

For some recent professional development I have been focusing on thinking routines from The Visible Thinking website.  One particularly powerful reflection routine caught my attention, so I created a related template for it in Google Drawings.

The routine requires the learner to complete this statement and explain why:
I used to think _____, but now I think _____.

Of course, this comes best after the students have done something that would have changed their thinking. It could be a lecture, video, book, event or a significant passing of time.

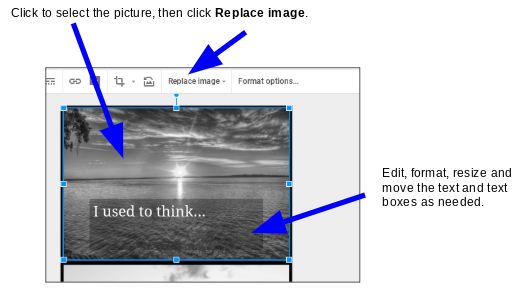
As a tech activity, I made a Google Drawing template (which you can get at the link below). It uses two photos and brief text. Ideally students would edit the template to make it their own, then explain to the class (or other audience) why their thinking changed.

Here's an example I made based on a shift in thinking that happened for me after I left the math classroom to work in ed-tech.


Click here to get a copy of the Google Drawing template.

As this next image shows, students can change the text and replace the images easily. I have a few other tips listed below.

Other tips for this activity:

  • There are many ways to get the images. Students can take them themselves or they can use the search feature. I include the word "Pixabay" when I search, so it will use the Pixabay site as a source. Images from there are free to use without attribution. 
  • If students use images from other sources, they should be sure they are citing their sources properly.
  • I made the text boxes a semi-transparent color to make text easier to read. With some background images you will have to experiment with text and fill colors and possibly font styles to be sure it can be read.
  • Remind students this is meant to be a quick tech activity. The thinking that goes into the wording and the explanation of why thinking changed is far more important than getting the right images and fonts. 
  • Download the Drawing as a JPEG or PNG file (in the File menu) if you want to post it in a blog, website or on social media.
  • This is good reflection activity for teachers too!

Saturday, August 11, 2018

Authentic Audience and Authentic Engagement - Interactive Stories Using Free Google Apps

I already wrote a lot this summer about the most exciting, creative project I've been involved with in a long time. I worked with some students to create a story one short piece at a time. What made it amazing was we'd publish the story on the school website, then let the readers complete surveys to tell us what should happen in the next chapter.

This gives the students experience with writing for an engaged, authentic audience. Everyone involved was excited to find out what happens next in the story!

We told our story in comic form, using my favorite method of combining real life photos with comic elements. Of course, it will be much easier to create the stories if they're written as prose rather than comics. I'm calling them interactive stories and I will outline the process below. (There's even a 10-page ebook with tips at the link at the very end of this post.)

We actually ran into a snag in the middle of our comic project, so I resorted to some written chapters just to keep the story going. That gave me some experience with what I'm about to describe.

The Flow of the Project


  • Explain the project to the students - This includes the very important aspect of telling them what course content you expect to see in the story. They need to know what they are supposed to learn from it.
  • Write the first chapter - Students (the Storytellers) would begin by writing a short chapter to kick things off. It just has to be long enough to introduce some characters and make a cliffhanger that will hook the Readers. I suggest using Google Docs for this, since it's easy to share in a later step.
  • Create a short survey - Using Google Forms, the Storytellers create a survey with three to five questions that will help them decide what happens next. We embed the link to the survey right in our story, so anyone who reads it can easily find it. See the link at the end of this post for lots of tips about making good surveys.
  • Publish the story - We put a shareable link to our story on our school website. The Readers would find it there easily, read it and complete the survey.
  • Make the next chapter - The real learning happens here! Combining the lesson goals, the Storytellers' ideas and the input from the Readers, the Storytellers have to plan and write the next chapter.
That process continues with another survey, publishing the new chapter, getting feedback and so on. As it comes to a conclusion (probably after several weeks) the Storytellers probably will request less and less feedback. 

If doing the story as a comic sounds even better (which I think it can be!) I created this ebook for the process using comics and it includes a ton of tips for getting started and working through the project. 

While it can be so much simpler to have students write the story in Google Docs, much of that ebook will till be helpful. The link below takes you to a free, shortened version that will help with these written stories.

Some tips specific to this written process are:
  • Use a fairly large font with generous spacing. Dense text is not fun to read on a screen.
  • Even with large fonts and spacing, try to keep the chapters to less than two pages. Your Readers might go for longer passages, but we found many wouldn't bother reading longer chapters.
  • Make sure you set up Google Forms so the responses are not anonymous. This is very important if you ask for open ended comments. As the teacher, you might choose to manage the survey responses.
I summed up the Gathering Feedback section of my ebook into a much shorter PDF. You can find it here:

If you do this project with a class, I'd love to hear about the results! Please send me an email and let me know how it goes. Include a link to the story too!

Thursday, July 12, 2018

Scanning Text to a Google Doc for Editing

Here's a neat trick I didn't realize would be so simple! Note that this only works on Android phones right now and I use a computer or Chromebook for the second part.

While doing a virtual book study of What School Could Be, I needed to copy passages of text from the printed book. I accomplished this easily by using the Scan option in the Google Drive app.

It's all shown in the two-minute video below, but here are the main steps.

  1. Open the Google Drive app on an Android phone.
  2. Tap the + and pick Scan.
  3. Take a picture of the printed text.
  4. Retake it or crop it as necessary.
  5. Click the + to add more pages.
  6. Repeat steps 3 - 5 until you've scanned everything you need.
  7. Tap the check mark. That will upload the scans to your Drive as a PDF.
  8. Then on a computer, locate that PDF in your Drive.
  9. Right click on it and select Open With Google Docs.
  10. Make minor edits to the text if necessary.
I've found it works very well. I made this informal video for the teachers in our book study. Itshows the screens as I go through the above steps.


Friday, July 21, 2017

Three Essential Tech Skills for Teachers with Chromebooks

I was at a small conference this week at our ISD. That means I spent a lot of time preparing sessions, presenting and chatting with colleagues. I realized I keep coming back to a few "essential skills for teachers", so I thought I'd compile my resources for them here.

These are not directed to teachers on the cutting edge of tech integration. They are for those many teachers who have Chromebooks, but mostly use them for research and managing assignments in Google Classroom. 

All of these appear on my blog somewhere else, but I'm combining them here along with some next steps or extended activities. And I added some essential reading at the end too.

Skill #1:  Getting photos and video from a phone or tablet into Google Drive

I'm still amazed at how many teachers don't use this. They (or their students) try to email files or even send them in text messages. If you can get a photo or video to Google Drive right on your phone, you have a bridge between the real world and your tech projects. From Drive, you (or the people you share them with) can open the images and videos on a Chromebook and use them in countless ways.

Here's my blog post and video tutorial about this. The video is just over a minute long, but I've seen this make a big difference for teachers.

Next Steps or Extended Activities

  • Most apps have other ways of sharing out the files. I didn't include it in the tutorial because of all the possible variations, but experiment with it on your phone. Can you get the content from your favorite apps into Drive? If so, it offers great options for projects on the Chromebooks.
  • The Google Slides and Docs apps on phones and tablets will allow you to insert the pictures directly into the document or slideshow. Imagine having a team working on the slides while another documents the activity by taking pictures. One teacher I showed this to last summer told me it's now a Day 1 activity for his middle school science classes.

Skill #2:  Making a PDF eBook Using Google Slides

PDFs can be viewed easily on any device. Teachers and students who can turn their slideshows into PDFs have a great opportunity for showing off the learning beyond the classroom. 

While it can take awhile to make attractive pages in Google Slides, the few clicks necessary to make a custom sized PDF only take about a minute. From there, the creation options for communicating to the world are endless.


Next Steps or Extended Activities
  • Mostly the next steps here are just to improve the design of your ebook. For example, more attractive images, better layouts, etc. This comes from exploring the different tools in Google Slides and learning about good design.
  • I've helped very young students create presentations in Google Slides. Even in kindergarten we had success with it. Of course, you have to provide more structure in early grades. For example, in that project I built the slides and put clipart on each one. The students just moved the graphics around to design their pages. In third grade we made ebooks and gave the students more freedom. There I simply created a blank slideshow and changed the dimensions of the slides as shown in the tutorial above. Then I shared it to groups through Google Classroom and they added the content collaboratively.

Skill #3:  Making a Recorded Slideshow with Screencastify

I created this tutorial several months ago, but it was clear at the tech conference this week that many agree with me. Screencastify is the screen recording tool of choice for a Chromebook. I love how it records the screen and goes immediately to Google Drive.

In my district, I encourage all teachers and any student in grades 6 - 12 to use that tool along with Google Slides to make a "recorded slideshow". It's a good first step in screen recording that lets teachers communicate a lesson or other information. And students can use it to show what they've learned.

See my tutorial here for complete information on this important process.

And here is my free Tech Project Pack about the process. It contains information and resources to help teachers integrate it into any subject.

Next Steps or Extended Activities
  • My tutorial is about recording a presentation as you click through the slides, but really you can record anything on the screen. You could introduce a website, a skill using a new tech tool or (by recording the camera) you can even capture live video. The paid version of Screencastify allows editing of the video to some extent and many other good tools are out there to make professional recordings. Camtasia is my favorite, but it is costly.
  • Explore tab recording in Screencastify. It gives you more tools as you record.
  • The same process can be used for digital storytelling. Imagine making the pages of a story in Google Slides, then recording it while telling the story and clicking through the pages. For young students, the whole story could be told with just a single slide or even a single photo.
  • Students can also use Screencastify to record their explanation of a problem. For example, they might use Google Drawings to create a visualization of a math problem, then they could record themselves explaining their thinking. 

Required Reading for Every Teacher Who Uses Technology

Be sure to see my post from earlier this summer about Liz Kolb's Triple E Framework. It is the most practical, research based model I've seen for directing or evaluating effective use of tech in the classroom. As my post explains, her website contains a lot of valuable information, but her book is well worth reading. It's called Learning First, Technology Second.

So that's my current list of essentials. If you have questions or suggestions to add to the list, please add a comment below or send me an email.

Thursday, July 20, 2017

How to Use the Google Drive App to Transfer Photos or Video from a Phone or Tablet

This is an essential skill for showing off the learning that takes only a few minutes to master, yet I regularly encounter teachers and students who can't do it. Take a minute to watch the video if you're still using USB cables or email (or worst of all, text messages) to get your files to a computer.

If you have photos or video on your phone (or you want to take some) to bring them into projects or share them with others, learn to use the Google Drive app. It's so easy!

It's the bridge from the real world to your projects. I've seen teachers get excited when they realize the possibilities this opens up for creative classroom projects.

This short video tutorial shows everything you need to know.


Tuesday, February 28, 2017

Another Fun Middle School Computers Lesson - Making Comics with Google Slides

I've been posting some of the creative projects we used in our middle school Computers class. (See this post on simple podcasts and this one on animation.)

Those of you who regularly follow my work will be very familiar with the basics of this one -- Comics with Google Slides!

When we did this in class, the excitement level went through the roof! Many students in my district have learned this process already, so some took their own pictures instead of using the ones provided in the directions. You can modify those as necessary for your class.

Click here to get a copy of the Google Doc that contains the directions for students. It links to this sample comic.

Those directions take students through the process of creating a comic. It uses some of my resources that you can find on my Comics page.

Also, this video tutorial is referenced in the directions. It shows the basic process.


And in case you missed the header image above, remember you can get my free ebook about making comics like this by joining my monthly newsletter list. Please click here to sign up.

Sunday, January 22, 2017

Creativity Game with Google Slides - Abe & Einstein

This post contains a link to the template you need to play this game, but you'll also want to see this post  which explains how to run these creativity games with your class using Google Apps.

My most popular posts on this blog are the creativity games and exercises. Over the past year I have been translating some of those ideas into a Google Slides format.

When played as a classroom game, this one allows 3 - 5 creative students to compete to make up what two random well known people would say if they met. For example, what would you overhear in a chance meeting between Spider-man and Santa Claus? How about Harry Potter and Justin Bieber?

The whole class participates by voting on their favorite response. The creative thinking required for this game can be a challenge, but I've seen middle school and high school students have a lot of fun with these games.

I also have suggestions at the end of this post for other ways to use the activity, possibly with less time or allowing more students to create the fun answers.


First, here's the flow of the game when used with the whole class. There is a video that shows this process below.

  1. Choose 3 to 5 students to be the contestants in the game. They should sit at the front of the room. They'll need either paper or a computer, depending on how you want them to share their riddle answers with you.
  2. The slideshow for the game (at a link below) is displayed so the class can see it. It will usually be on the game slide, slide 2.
  3. The teacher draws two random names from the group and displays them for the contestants to see.
  4. The contestants get two minutes to write a few lines of what those people might say if they met. Each student sends his or her lines to the teacher.
  5. The teacher reads them to the class and they are entered in the game slide so the students can see them.
  6. The students in the class now have the chance vote on the their favorite haiku (using a classroom response system or possibly Google Forms).
  7. Points are awarded to the contestants based on the number of votes they received.
  8. Steps 2 - 6 are repeated three or four times, then scores are totaled to determine a winner.

Here is the Google Slides presentation that you'll need to play this game or to do any of the activities listed below.


Click to have a copy of the Google Slides presentation added to your Google Drive. 

Video Overview


This 4 minute video shows how to play these creativity games with a class. It contains a different game about answering a riddle instead of writing dialogue, but the process is the same. (If you're interested, here's the post about that game.)


Tips and suggestions for other ways to use the activity

  • Obviously this chance conversation should be brief. Students should try for 2 - 4 short lines.
  • To indicate who is talking, students can use initials. So using the Spider-Man and Santa Claus example, a student could write:
    • SC:  Hey Spider-man, can you teach me to crawl walls like that?
    • SM:  Sorry Santa, lay off the milk and cookies then check back when you look this good in tights.
  • You might not be able to fit the whole dialogue in the boxes on the game slide. Read the full submissions from students, but for voting, t's usually sufficient to just sum up it up a few short words to help students remember each one.
  • Usually the students make funny conversations in this game, but you could require different criteria for the "best" one.
  • Have some things to show the rest of the class or to talk about while the contestants write their dialogue. See my post about creativity exercises to get some ideas that will involve everyone.
  • It's easy to change any of the names that I made for the game. Just draw one out and double click on the text. Use names of people related to what you're studying in class. Or pick names of people at your school, like your principal or the custodian. This gives the students a chance to practice being funny while still being respectful. Note that I did put "Your Teacher" in the mix!
  • You can have the rest of the class write their own ideas for dialogue too. After the vote, have some of them share what they wrote if they want.
  • If you don't want to devote much class time to the game, just draw two words at the end of class and have all students make a haiku for homework. You can select your top 5 and have them vote on the best one as a warm-up in a later class.

Sunday, November 13, 2016

Finally! Collect Files in Google Forms


This past week I was presenting a session about Google Forms when I noticed they activated the File Upload question type. This is an option I have wanted for a long time, so I was glad to see it!

Note that it's only available on my G Suite for Education account. I don't know if they plan to release it for regular Google accounts or not.

While teachers can easily get file submissions from their students through Google Classroom, this upload option makes it possible to get files from anyone. I can see it being very useful for gathering pictures from families for a yearbook or for collecting documents that might be posted on the school website.

Here's how it all works.

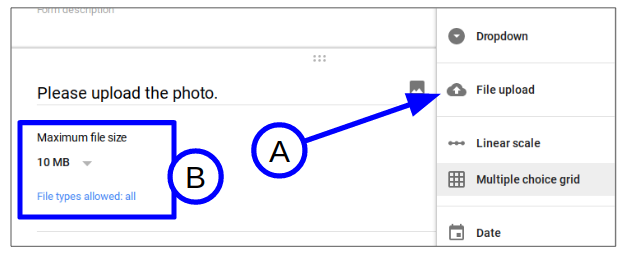
First, start a new Form like you always would. Type the text you want for the "question". In this case it will probably be directions for which types of files you want the user to upload. In my example, I used the text, "Please upload the photo." (Note that you can add other questions to your Form like always. In this example I'm only focusing on the File upload question.)

A)  Select File upload as the question type. It will first give you a warning that any file submitted through the Form will go to your Drive.

B)  After you continue past that warning, you'll see two other options appear under your question. If you click the first dropdown, you'll see different file size limits you can restrict the file to. The second dropdown lets you accept any file type or limit it to certain media like audio, images, presentations, etc.

When you share or post your Form so others can respond to it, the next picture shows how these questions will look. It has the text you type and an "ADD FILE" link. When the user clicks that link, he or she will have an option to upload the file from a computer or from Google Drive.


Note that when a user chooses a file to upload, it immediately goes into his or her Google Drive. 

Once the user submits the Form, a copy of that file (not a shared file) is uploaded to your Google Drive. You will be the owner of that copy. It goes into a folder that is automatically created and that will be given the same name as your Form. It also adds the user's name to the end of the file name, as you can see in the next picture below.

You can easily access the uploaded files in the Responses tab of your Form. You'll see in the picture below they are listed under the text you entered for the File upload question. You can also click the VIEW FOLDER link to open the Google Drive folder that contains all uploaded files. 


Friday, October 21, 2016

Creating Self-Grading Quizzes with Google Forms and Administering Them Through Google Classroom

Here are two videos I created to show the teachers I work with the self-grading features of Google Forms. This makes a great option for a quick formative assessment.

This first video shows the basics of making a quiz with Google Forms. I focus more on the quiz aspect than the question creation steps. You'll notice I say that Gmail is not an option for students, but that's just because in our district we have it turned off.


This second video shows how you can assign that quiz to your class using Google Classroom. It also shows the steps for accessing the results and returning it.


Monday, April 4, 2016

My Google Drive Quick Tips

Over the course of this school year I created a few "Quick Tips" about Google Drive and other tools for the teachers I work with. My goal was to highlight easy, useful features in under two minutes.

First, a couple general comments:

  • Google updates the apps frequently, so even the more recent videos might show slightly outdated interfaces. The general processes are the same though.
  • Some of these are very informal recordings done quickly for other purposes. I trust they'll still be of use as a quick lesson.
If you have any questions or comments, please leave them below or send me an email. I'm always happy to help and I'll add to this list as more information is requested.


Navigating Google Drive

Organizing files in Google Drive


Uploading files of any type to Google Drive


How to share files in Google Drive using Link Sharing - It's better than typing everyone's email address in that box!


Inserting images in Google Docs


Adding hyperlinks to Google Docs, Slides and Drawings


Adding comments to a document - This includes tips on doing this without taking your hands off the keyboard. That's really helpful when grading several papers!


Tuesday, February 23, 2016

Make Growth Mindset Achievement Pages for Students Using Google Apps

Here's a quick way to help students develop a growth mindset as you recognize their progress. You can create achievement pages for each of them using Google Apps such as Drawings and Docs.

At the end of a semester or year, students will have a record of milestones they passed in their learning journey. You can personalize them as much as you want for your class and the students. Be sure to encourage a growth mindset by praising effort and the process of learning.

Here's the procedure:

First, make a blank achievement page as a Google document. Put the student's name at the top and any other information you want to include. I also suggest adding a table to the document to keep the achievements organized. Once you get the basic arrangement you like, you'll copy the document and change the name for each student in your class.


Next, search Pixabay to easily find quality public domain clip art of awards and trophies.


Copy and paste a few of those clip art images into a blank Google Drawing.


Add some Word Art, shapes or text boxes to decorate each award. Make them personal! Name them after your favorite phrases, teaching techniques or projects. Of course, encourage a growth mindset too. If you need ideas, here's a great list of resources from Vicki Davis' blog.

Ideally you'll make a few generic awards. You can also make custom awards this way at any time, even at the last minute for some achievements. The more personalized and relevant to the project at hand, the better.


When it's time to recognize a student's achievement, "snip" a copy of an award. You'll use different tools for this depending on the type of computer you're using. On a Windows computer, use the Snipping Tool. Here are keystrokes for a Chromebook or a Mac. Note that it is easiest to copy the image you capture rather than  just saving it to your computer.

Paste that snipped image into a table cell on student's achievement page. Add a note that is specific to what they earned the award. Include a date too.


After you add the first award, share it with the student. If they have Google Apps for Education accounts, this is easy. Just Share as you would any document, but be sure to make it View only. You don't want them to be able to edit these achievement pages. 


If the students don't have Google accounts, use link sharing and send the link to the student (possibly at a parent's email address) or using a link shortener like Goo.gl.

Add awards at anytime after you've shared it and students can see their updated achievement sheet at anytime. They can drag the URL to their bookmarks bar in Chrome, so it's always only a click away.


Sunday, February 21, 2016

Using Google Tools for Classroom Creativity Games

A couple weeks ago I wrote about a creativity game template I made in Google Slides. (Read that post for details on how the games are played with a class.) Making the games in this flexible tool should allow a lot more teachers to take advantage of what they offer.

Now I'm going a step further and showing how to run the entire game with Google tools. These are the ones I'll be using:
  • Google Slides for the game template
  • Google Docs for the contestants to submit their responses to the teacher
  • Google Forms for the class to vote on their best response
  • Google Classroom for getting the Form out to the class when it's time to vote
I'll explain the process with two videos. The first shows how to prepare to play.


And this second video shows how to run a round of the game with the class. 


Note: In case it wasn't clear from the video, the responses I copied from the three shared documents would be written by the contestants after they see the prompt for the round. They would each have their document open on a Chromebook or other device. When they're done, you copy and paste them into the slideshow so the class can see them for a vote.