Showing posts with label technology integration. Show all posts

Sunday, November 7, 2021

Go Beyond Challenge - Update #1


Road Photo by Nextvoyage from Pexels
Photo by Nextvoyage from Pexels
Last month I wrote about the Go Beyond Challenge that I raised to several teachers in the district. Things have been going well. Here are some updates.

  • I am formally working with seven teachers, ranging from 1st grade through 12th grade. Some of the other new things I'm doing within the scope of the challenge involve many other teachers. We're a small district, so this has already involved 20% of our staff.
  • I wrote a post on my Teaching Like an Artist blog that summed up my goal when I'm working with students during this challenge. I'm looking for opportunities to encourage their talents and also to encourage them to press through their areas of weakness. I want them to see school as intensely personal, revealing what they're great at and giving them a chance to get better at everything else. That should come in handy no matter where they find themselves in the years ahead.
  • For actual projects, I've worked with a high school Cold War History class, where students made podcasts and websites so far. That work will continue throughout the semester. I also am in the middle of a writing project at the 6th grade level. There students are writing stories for younger students. It's an improved approach to this project from a few years ago. 
  • With the other teachers, we've been planning. Topics so far are game design, creating video tutorials, virtual debates and informational videos for our community.
  • I'm happy to say my proposal to speak about the Challenge at the MACUL Conference was accepted. I look forward to reporting how our efforts have moved the teachers and students forward in a big way this year, including helping them to see their own potential as leaders among their peers.
  • Lastly, I was thrilled to come across Dr. Sonny Magana's book, Disruptive Classroom Technologies, last week. How had I not heard of this before? I'm including his T3 Framework in all project planning moving forward. I was focusing on Triple E and the 4Shifts Protocol previously. From what I've seen of T3 so far, it is exactly what I have been looking for. Some of us from the district will meet with Dr. Magana this week to discuss how T3 can help our district.
Here's a tweet I posted about the book today, along with the quote from his book.

Tuesday, June 27, 2017

Essential Summer Reading - The Triple E Framework

I first heard about Liz Kolb's Triple E Framework and the accompanying book in her interview with Vicki Davis. I was intrigued. The more I looked into it, the more I'm convinced this is something every teacher should study over the summer.

What is the Triple E Framework?

At the core, it's a simple idea with just a few important resources. I'll sum it up here and include some links.

As any teacher is aware, adding tech to a lesson doesn't necessarily make it better. It might make it a lot worse. Even if the students are actively using the technology and having a great time completing the lesson, it doesn't mean they're learning the content at a satisfactory level.

Liz Kolb addressed this problem by giving us a list of research-based practices and standards that sum up how to best integrate tech. As you might guess, it's based on three E's:
  • Engage - This is authentic engagement with the learning goal (not just the tech).
  • Enhance - This is about choosing tech that adds value to the learning experience.
  • Extend - And here we look at extending the learning beyond the classroom, to the students' personal lives.
The way Kolb defined those three aspects of learning with tech resonated with me immediately. She was putting into words so many things I witnessed and felt as I worked in dozens of classrooms over the past five years. What I love about her work is that it's clear, practical and backed by research

And she relentlessly emphasizes the learning goal of the lesson over the tech. As obvious as that might sound, we all know that's not always what happens when a teacher or administrator discovers some new tech tool.

All of this can be found in her book, Learning First, Technology Second.  I'll say more about the book below, but the good news is everything is open source and it's freely available on the Triple E Framework website. Here are some key parts you'll want to look at:
  • Overview - This page defines those three E's above, but it also lists the nine questions that teachers should use to guide lesson planning or evaluation. The video on this page provides an excellent summary.
  • Rubric for Lesson Design - This is a simple, free tool that allows a teacher to score a lesson based on how it measures up on the nine questions. Every teacher should use it until they've memorized it!
  • Lesson Planning Template - Here's the same information in a slightly different format for lesson creation.
  • Instructional Strategies - We know any tech tool will only be effective when it's supported with quality teaching. Here are three lists of strategies that can support tech for each of the E's.
  • Case Studies - Here are some examples of putting the Framework into action at various grade levels.

What about the book?

I ordered the Learning First, Technology Second right away because I knew I would want the full story. It didn't disappoint!

It provides a lot more detail that what you'll find on the website. Several examples illustrate exactly how the rubric should be used to effectively evaluate a lesson. There are also many more examples of quality lessons in the book.

I most appreciated the chapter on effective instructional strategies that support good use of technology. Rather than just listing them like they are on the above website, the book explains a number of important ones for each of the three E's.

I read the book quickly, but I'll return to it many times for these examples and lists.

Here are a few things that stood out for me:
  • For true engagement, students need a social aspect. Try to leave room for "co-use", either between students or between the student and teacher, when tech is being used in the lesson. That means two students on one device might be better than 1-to-1 and some conversation about the learning goal should be happening as they use the tool.
  • Up to 70% of apps that are promoted as educational have no research behind them to support the claim. We can't assume the tech alone is accomplishing anything as far as real learning. Teachers must be sure instructional strategies are in place when the students are using the tools.
  • Every lesson doesn't need to score high on all three E's. What matters most is that a teacher naturally begins to evaluate tech use in light of the Framework and looks for opportunities to improve in each area.
My only regret about the book is the title. I think it might make it too easy to dismiss. After exclaiming about how much I love the Triple E Framework, I showed the book to another instructional tech and he was less than impressed. Looking at the title, he said, "Yeah, but we all always say that." 

I agree that the heart of the Triple E Framework is to make the learning goal first priority, not the tech. I just hope educators will not stop, thinking they'll find nothing new. The wealth of practical ideas in the book is well worth exploring, even for those of us who have been proclaiming, "Learning first, tech second," for years.

Friday, August 5, 2016

The Updated 10 Ways to Show Off the Learning Beyond the Classroom

I first made this list in the summer of 2015. With each year of experience behind me and changes with the tools I'll keep updating this. Most updates were made in 2016, but a few have been added in July, 2017.

New items and information are clearly noted below.

When teachers and students show off the best things they learned, perceptions change and the culture changes. I want to make sure my district is known as a place where important learning happens every day.

But a lot of teachers in my district like hands-on, physical projects. Just how many art exhibits and science fairs can you do a year?

So I compiled this list so even those paintings done with real paint and the science experiment made of food can be shown off to the world.

I made this for the teachers I work with daily, so please keep in mind:
  • It is a tool for awareness, not a how-to guide. Teachers in my district would contact me for one on one help. Since most of you won't have that option, I added links below to many of my Tech Project Packs. They were designed to help teachers quickly incorporate tech into their projects. I wrote about them all on this blog here.
  • Most classrooms in my district use laptops or Chromebooks. I didn't include options for tablets with most of the ideas.

1) Live broadcasts of student presentations - Use The Cube
  • You can broadcast to the internet easily with an iPhone or iPad. 
  • Someone from your school will have to sign up and create an admin account at the site.
  • Share the link to your broadcast with parents or to the community beforehand so anyone can watch live. 
  • The recording can be left online, so people can watch it later if you want.
  • When using live video, be sure you have parent permission to post online and remember not to identify students by first and last name.
  • New information:
    • I actually haven't used The Cube for a couple years now, since I wasn't involved with any live broadcasts in my district. It appears that service still works as described here, but now the two social media options below might be better.
    • I have used Periscope for some personal projects and I love its simplicity.
    • And of course Facebook Live is a very popular way to go now.
    • Update 2017: If I do live announcements now, I'll use YouTube Live.


2) Websites and Blogs - A simple site or blog (created by you or the students themselves) is the starting point for sharing all the other types of project presentations listed below.


3) A PDF ebook - Within seconds anything students make in Google Docs or Slides can be turned into a PDF. From there it can be posted on any blog or website so anyone can open or download it like an ebook.
  • With the file open, go to the File menu and select the option to Download as PDF.
  • Once the PDF is downloaded, upload it to Drive again and share it as needed.
  • New information: This tutorial is specifically about making a comic, but it does show the process of downloading a PDF from Google Slides.


4) InfoPics - If he didn’t invent this simple concept, Tony Vincent is the one who named it and he sings its praises. This really is just a process of adding notes or other text to pictures that are related to a topic. 
  • Here's Tony’s blog post about it (with examples).
  • It would be very easy for students to make these and share the images on a website or blog.The pictures could also be shared by a teacher or a parent on Instagram, Twitter, Facebook or any other social network.
  • The device you like to use will dictate the tools, but I’d suggest Google Drawings for computers or Chromebooks. Pixlr.com is a good tool on many devices if you want to add more effects to your pictures.
  • New information:
    • Update 2017: I used to recommend Adobe Spark as the first tool to check out for this. They call the pictures with text "Posts". Here's a tutorial about using it. It's still a great tool, but students under the age of 13 cannot sign up for an account without lying about their age.
    • My Tech Project Pack for Infopics has tutorials for all the tools listed here.

5) Infographics
- Students can create infographic images to show facts in a concise, visually appealing way.
  • Finished graphics can be posted on social media or websites and blogs.
  • Piktochart is a great tool for this.
  • Users can log in on Piktochart with their Google accounts.
  • Here’s a good article from Matt Smith with ideas for Piktochart in many subjects.
  • New information:
    • They have added a presentation option to Piktochart. Now with the click of a button the infographic can be used as a more traditional slideshow for live presentations.
    • Here's my Tech Project Pack for infographics.


6) Audio Recordings (podcasts) - Students can create audio recordings and share them online in a variety of ways. These can be completed much faster than a video project. Here are a few details.

7) Virtual books on Flipsnack - This site is a great tool that turns any PDF into a fun virtual book. 
  • Important Note: I found out if students sign in using a Google Apps for Education account it uses the first and last name in the URLs. This is not a good practice. See the link to my new tutorial below about changing the username so it doesn't include student names.
  • I usually create the PDF in Google Slides or Google Docs first, then upload to Flipsnack.
  • Here’s an example I use for a comic assignment.
  • Users can sign into Flipsnack with their Google accounts.
  • Free Flipsnack accounts are limited to three virtual books at a time.
  • New information: Here's an updated video tutorial on turning a Google Slides presentation into a Flipsnack. Be sure to watch the part that shows how to change the username in Flipsnack.

8) Screen Recordings - Think of these as somewhat informal recordings of something the students show on the screen. 
  • These are great for tutorials or presentations.
  • Here’s an example from a teacher who has his students use this method a lot.
  • They’re informal because editing is usually not part of the process. Students need to practice before recording!
  • On a computer with a mic, use Screencast-o-Matic.
  • Final results can be uploaded to Google Drive or YouTube for sharing as necessary.
  • New information: Update 2017: I used to highly recommend the SnagIt for this, but it is no longer available. I use Screencastify. Here is a recent post about how I create these.


9) Digital slideshows - These are a series of pictures combined into a video by using an editing program.
  • These are a step up from screen recordings because you can (and should) edit them.
  • Students can add audio. It might be just background music or they can narrate the slideshow.
  • With narration, these become presentations that present themselves.
  • They make a good introduction to video production, but don’t require as much time.
  • New information:
    • Forget everything you read from my blog about previous methods for this! I now recommend Adobe Spark Videos as the best tool. See this video tutorial for an example and how-to tips.
    • Update 2017: I still like Adobe Spark for video, but we had problems using it on Chromebooks. Also, students under the age of 13 cannot sign up for an account without lying about their age.

10) Videos - Producing a good video is the pinnacle of technology integration in most classes.
  • Good videos require several technology skills and a deep understanding of class content. 
  • There is a huge range of possibilities for complexity. Don’t just tell students they can “make a video”! Know the options and set guidelines that are appropriate for your students.
  • Here are my tips for teachers and students for any video project.
  • New information:
    • I'm in the process up updating some resources for these projects. Honestly, I've found they take a long time and I have been encouraging the digital slideshows over full videos. I will say I now prefer the paid version of WeVideo for the editor. Note that the free version is not COPPA and FERPA compliant.
    • I did post about two video projects we did this year. One was a team building challenge and the other was designed to introduce students to iMovie on an iPad.

Wednesday, May 18, 2016

Quick Start Tech Projects for Any Class

After two years of helping a lot of teachers get started with different tech projects, I finally got smart and combined the many existing tech project resources I've created.

My goal was to save time for teachers. Having everything in one document (or at least linked from one document) can cut out a lot of emails or our initial planning meetings, since now they can find these documents on one single webpage.

Instead of taking me out of the picture, it allows them to ask me the questions that are most relevant to their class a lot more quickly

Each of these "Tech Project Packs" focuses on one type of final product, like a blog or an audio recording. It answers important questions such as:
  • What is this type of project best for?
  • What tools are needed?
  • What are some common challenges?
  • What tutorials do you have for it?
  • What should I include in the directions?
  • How can we share it beyond the classroom?
We are a Google Apps for Education district and most students are using Chromebooks.

Here are four packs to start with. More will be added in the upcoming week. 
  • Images with Text - A very quick project that can be adapted to any subject
  • Infographics - Create informational "digital posters" with Piktochart
  • Blogs - Good for getting started using Blogger
  • Audio Recordings - A simple process for creating audio recordings on a Chromebook or laptop
If you have any suggestions or requests or if you see problems with the documents or links, please let me know.

Sunday, May 15, 2016

5 Myths About Ed-Tech That Keep You (And Your Students) From Being Amazing

It might not look like it, but the infographic below is my story from the past few years as I worked with several teachers. In that time I regularly heard the same misconceptions from them as I encouraged more tech integration and creative projects in all classes.

I call these misconceptions and myths, but in reality they started to sound more like excuses. That's understandable. We all know change isn't pleasant.

But whether someone actually believes these myths and is looking for a way to innovate or if they've just used them as a reason to do business as usual, I'm countering each of myth with a few ideas that I know to be true.

I and the many teachers I work with are not perfect examples of innovative educators, but together we've seen that change is possible. We've seen that a technology project in a core subject can let students shine in exciting ways. We've realized that when it all doesn't go perfectly, it's not a bad thing to struggle and learn in front of the students.

So I put some of the things I learned into the infographic below. You can view the full image here.

I have each frame of it below along with thoughts, resources and links than I could include in the graphic.
__________________________

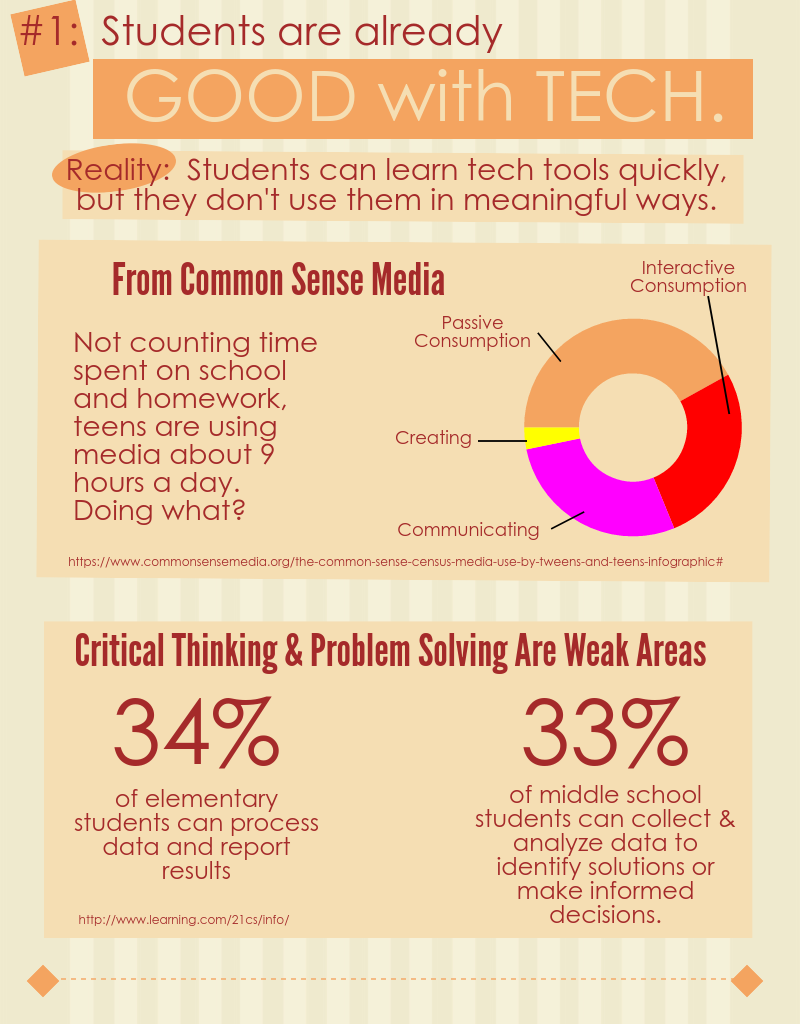
Myth #1:  Students are already good with tech.


Reality:  Students learn tech tools quickly, but they don't use them in meaningful ways.

I've been impressed with how quickly students can learn to use new tools. Not intimidated by tech, they jump in and figure out how to make it do what they want almost immediately.

When it comes to doing something meaningful, though, they have a lot to learn. If we look for evidence of skills for success in today's world, such as writing a blog post someone would read or making a persuasive, watchable video, we can see there's a lot of room for learning.

I included a few stats in the infographic to support this. They're from these studies:


To illustrate how quickly students can learn new tools, this post and this one give examples of how I introduced students to iMovie. Many times it's just a matter of showing them what's possible first.


Myth #2:  We haven't had enough good professional development.


Reality:  You can take charge of your own PD.

I'm glad when I see some teachers discover they really don't need me. They realize a quick Google search or a video on YouTube can help them learn what they needed.

The main idea for this section of the infographic came out of an informal survey I sent out to my PLN (and some of them shared with their own). I wrote about it in detail in this post. The big take-aways are in this slide.

  • Over 70% of the respondents said they learn new tech tools on their own or from colleagues.
  • Only around 2% of them claimed that traditional styles of district provided PD helped them learn to use the tech tools they rely on in the classroom.
Now, it is my job to help teachers and I'm not trying to get out of that responsibility. My point is that we can't just stay where we're at, always waiting for that perfect PD session to give us what we need. Limited budgets and different needs makes it an unlikely scenario. Besides that, the vast majority of the people making a difference do not attribute their success to such an experience.


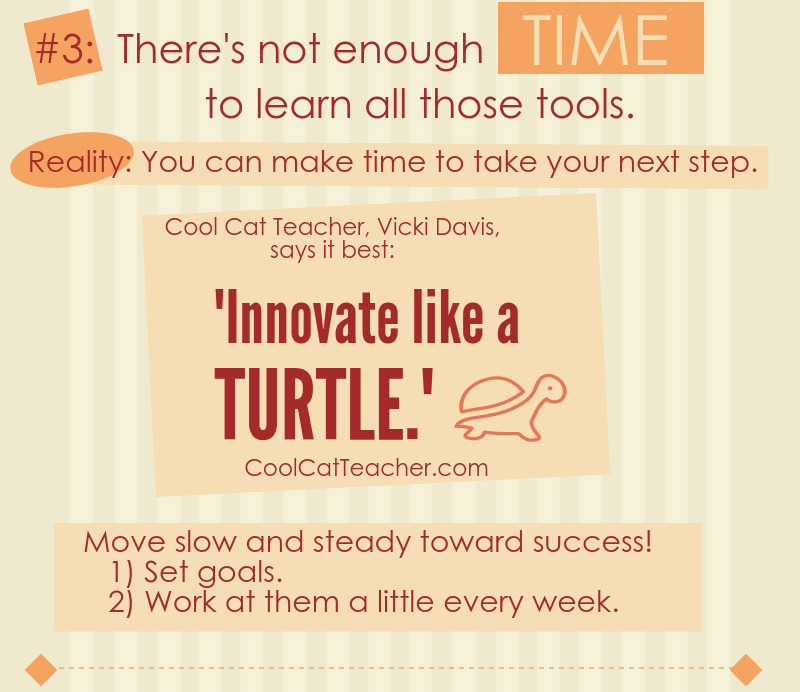
Myth #3:  There's not enough time to learn all those tools.


Reality:  You can make time to take your next step.

Innovation can sound intimidating, but often it boils down to identifying your next small step and taking it. We all have a next step, and for all of us that next step is a challenge. When it comes to modeling lifelong learning, though, do we really have a good excuse to not regularly take that step?

This slide is based on quote from Cool Cat Teacher, Vicki Davis. I love her blog and podcasts. She is a model of an innovative, lifelong learner.


Myth #4:  Tech takes too much time from my class.


Reality:  It doesn't have to.

All I can say in response to this myth is that I've seen teachers integrate technology in ways that didn't take up a lot of class time. Yes, sometimes it can take more than it should, but this slide lists some practical tips I've learned from working with many classes.

I also want to link to a couple blog posts about very simple tech projects. If you need a first step, these might be good starting points:

  • Infopics - Simple tools for adding text to pictures
  • Audio recordings using TwistedWave - This simple online audio recorder integrates with Google Drive and can result in a very quick project at the end of a lesson.


Myth #5:  Tech is important, but ________ is more important.


Reality:  Effective tech use will help accomplish more of what's most important.

Some will say this point is too idealistic. It's a simple fact, though, that a person who can effectively use the best tool for a job has an advantage over anyone who can't use that tool. I want that advantage for the students that I work with.

This final slide is based on my AMP Up What's Working activity. It's a great resource to get teachers thinking about the proper use of technology in their work.

When we get beyond the idea that tech just makes things easier and saves time, we can clearly see the advantages that it offers. We can more easily identify the best tool for accomplishing what matters most.


What other myths, misconceptions or excuses have you heard when it comes to incorporating more ed-tech? Are there some reality statements above that you still disagree with? I'd love to hear your thoughts in the comments or by email.

Sunday, March 20, 2016

Using Technology to Amplify What's Working

This post is about a resource I created for for teacher professional development sessions about tech integration. It serves at least three purposes:
  • It reinforces the idea that technology should be used for more than just saving time
  • It introduces teachers to good research-based instructional strategies.
  • It provides a common language and vision for effective use of technology.
It's based on the idea that technology amplifies. Like a lever can allow one person to lift more or a shovel can help one person dig more, technology in the classroom can increase the effectiveness of good instructional strategies.

A link to the document is below. As teachers work in pairs or a group of three to fill in the table, it requires them to go through this process:
  • Identify and describe a few good instructional strategies - I have been providing these, but teahers could start by sharing some they use or possibly researching them on their own. I like to direct them to John Hattie's work and this page is a good starting point.
  • Identify tech tools they have available that can amplify the practice - It helps to give an example here. I use lecture, since everyone is familiar with it, but it's not likely to be on the top of the list of effective practices. As an example of enhancing it with technology, we talk about how video can be used in powerful ways in flipped and blending learning models. It's important that specific tools are mentioned. For example, if the teachers use Chromebooks I'd suggest SnagIt as a great tool for recording the screen.
  • Identify (and possibly describe) the ways the technology gives an advantage - This is the heart of the activity. I call these ways "AMPs", which stands for Achieve Maximum Potential. Some example AMPs from my list that we could mention for amplifying the lecture would be:
    • Improves the access for learning - Students can watch it even if they're not in class.
    •  Personalizes the learning experience for the needs of the learner - They can play parts again or skip ahead as necessary.
I included 10 AMPs in the document, each labeled with a letter to make it easier to complete the table. A description of each, including examples, is on the second page.

Saturday, October 17, 2015

Teachers and Students Discover the Power of Technology for Learning

This is a combination of two posts from my Teaching Like an Artist blog. I'm doing a series there about topics related to our upcoming presentation at miGoogle 2015.

The first part is an interview between me and Jake. The second part shows the encouraging responses we received from a student survey. Both highlight how encouraging this activity was for us and the students.

The Interview
In preparation for our conference presentation, Jake Gentry, a Geometry teacher at the high school where I work, decided to try an inquiry based learning activity in his classes. We have worked together on a couple project-based learning activities in the past, but we both felt we weren't being "hands-off" enough in letting the students explore the concepts.

To see if inquiry-, discovery-based learning could really work, Jake went all in and had students explore and discover using technology instead of using any direct instruction.

In this recording (around 10 minutes long) I asked him some questions about what he did, what he learned and how effective he thought it was. They're still working through the project, so these are his thoughts so far.

The general outline of the talk is:
  • Why we did it
  • What the activity was like
  • What has he seen so far - is it working?
  • The level of thinking that was going on during the activity
  • What tech did the students use for learning?
  • What tech did he use to run the activity?
  • What effects has he seen on the students?
  • Was there support from the principal?
  • How the focus shifted from "Is this right?" to the learning goals


_________________________

The Survey
Next we gave the students a short survey to see what they thought about the experience. We received 86 responses and a few significant findings are reported below.

Overall, Jake and I were again encouraged by what we learned. This makes it even more likely he will continue exploring these teaching strategies in future lessons.

We first asked students to indicate how much they agreed or disagreed with this statement:

I prefer to learn by exploring on my own instead of just having the teacher explain material to us.

Here are the results, from Strongly Disagree to Strongly Agree:
I was surprised to see only about 15% of the students disagreeing. This was a great sign that the students were with us in this endeavor. I thanked them for trying this out and being such great sports about learning with us.

For many the seven class periods spent exploring a guiding question without much direction from the teacher was the first experience with such "hands off" learning in math. It was wonderful to see the students were this open to it.

After reading some comments from the students, I made it clear that our intent is not to replace teachers with computers. Obviously it helps to have an expert in education designing the learning experience, even if he or she is not delivering the material to the class in a traditional manner.
________

Results of this second question were most significant to me. Again, they were asked to rate how much they agreed or disagreed with this statement:

I can learn a tremendous amount on my own by exploring online tools such as search engines, videos and interactive websites.

Note first of all that this statement is not limited to Geometry or even math. It is simply a statement about being able to learn with online resources. 

Also, it's interesting to me that Jake and I debated about using the word "tremendous". I pushed to leave it, even though we knew it could make some students less likely to agree.

This is how they responded.


Jake gave me a high-five when we saw the graph after the first period. When the upper ratings remained high class after class, I was excited. I get chills when I talk about this stuff! To me, 4's and 5's on this graph (submitted by a full 73% of the students) means students are aware of the possibility before them to learn in amazing ways. 

Doors of opportunity opened to students who realized this through our lesson. In whatever areas they choose, they inched a step closer to success this past week.

We had a couple open ended questions on the survey and many students did say that through this activity they realized they could learn by exploring online resources. Some admitted they didn't think they could, but now they know otherwise. Some referred to gaining confidence by working through the lesson.

Jake and I know there's a lot we can do to improve the activity. Realistically students might be giving themselves way too much credit for what they actually learned. Still, this is the kind of thing that gets me out of bed in the morning. I love encouraging students to use the power of technology for learning. I look forward to seeing where it takes them.
_________________________

This is a combination of posts from a series on my conference session, The Way of the Google Drive. Be sure to follow me on Twitter or on either blog to keep up with the "thoughts and tools to inspire". 

Click here to see all the posts from that blog with the tag The Way of the Google Drive.

Tuesday, April 8, 2014

Using Google Drawings for Comic Creation

I was reminded recently that Google Drawings has Callouts in the shapes of speech and thought bubbles. Used in conjunction with the app on a mobile device, this makes a great tool for collaborative comic creation.

I put together this quick sample using a few pictures I had on my iPad from a PD day in our district. Ideally the pictures would be of actors or maybe toys or other objects set up according to a script.


Here's the process:
1)  Take pictures of the actors or objects for the comic. You could draw these on paper and take pictures or make them in a graphics program too.

2)  Upload the pictures to Google Drive using the app (if using a mobile device) or with the computer (if you created them in a graphics program on a computer).

3)  Using a computer, create a new Drawing in Google Drive. Share it with anyone who will be working on the same project.

4)  Set the background color.

5)  Add each picture and edit/arrange them. I found this order worked best overall. You'd repeat this for each frame of your comic on the page:

  • Import the picture.
  • Crop it with the crop tool.
  • Resize it as necessary.
  • Set the line width and color if you want borders.
  • Move it to the correct place.
  • Add the Callouts from the Object dropdown. You'll see speech bubbles in a few shapes and a thought bubble. 
  • "Draw" the speech or thought bubble on your picture
  • Drag the "tail" of it to the person talking or thinking.
  • Type the text in the speech or thought bubble(s).
  • Resize and move the bubble and text as necessary.

6)  Add any other text boxes or text to the Drawing.

7)  Download as a jpg image and share with others if necessary.

8)  Copy or import the image file into a shared Google Document. There it can be a page of a book made up of a series of such pages/images. You could put it in a Google Presentation too if it's more likely to be displayed that way.

Monday, February 17, 2014

Degrees of Tech Use in Education

I've been working on this thought for awhile, but the missing piece came from a simply stated insight from Terry Heick in this short interview. He said his advice to teachers regarding tech integration would be:

"Think of it as a learning tool, not a teaching tool."

It's my job to help teachers infuse more technology into their instruction and that is too often hindered by a misunderstanding of terms. It is easy for some teachers to say they integrate technology because they use their interactive whiteboards and students play on Study Island in the lab.

But technology use in education has to be seen as a spectrum, not a yes-no question as to whether a computer is on in the classroom.  I'm sure some of the distinctions I make below would not matter in all schools, but here is the image and terminology I will begin using as I teach teachers.


Of course, my goal is to help every teacher to take the next step toward the innovation end of the spectrum. First, I want them to identify where their instruction would fall on the scale most days using this criteria:
  • Teacher use - The technology is in the teacher's hands and it is essential for her to do her job. Examples - Lesson in PowerPoint projected in front of the room, lesson plans done in a calendar shared with the principal, grading program
  • Student use - Students need to use technology to complete the lesson. Examples - Watch Khan Academy videos at home, find the assignment in Edmodo, read the article in Newsela
  • Integration - This is the important distinction for me because I am working toward integration of content objectives and technology skills. Here students can't complete the lesson without learning a new technology skill. Examples of this could look like student use above, but the difference is the teacher designed the learning so most or all students will use a new tool in a new way to learn a new skill. The step in tech skills has to be small enough that it enhances rather than distracts from the learning of the content.
  • Innovation - Here the teacher is using the technology to design learning experiences no one else has used before. This is exciting, but difficult work. It stems from a high degree of digital literacy in which the teacher thinks creatively with the technology, expressing herself through the blend of her unique personality and broad range of personal experiences.
Two thoughts:
  • Each level is a spectrum as well. There are levels of tech integration and levels of innovation. The idea of what counts as "new" can relate more or less to the teachers and students themselves, the district as a whole or possibly the world.
  • I will be thrilled to have all teachers at the Integration stage. Innovation is vital and I believe passionate teachers will automatically move in that direction. We need innovators leading the way, both in the world at large and within our districts. However, students acquiring appropriate tech skills within the context of content are a lessons is exciting.
If this becomes an effective tool in our district I will follow up with some examples.

Thursday, August 15, 2013

New Creative Learning Systems Lab

I'm in training this week for our new STEM lab from Creative Learning Systems, so I put the video below together for our Facebook page.

This is coming to our middle school.  This lab represents everything I wanted to accomplish in my math class years ago as well as all the technology integration and project based learning I've worked toward the past few years.

Lots of learning and fun ahead!

Thursday, April 19, 2012

Interactive Game Assignment 2 - Career Quizzes

Last winter I worked on an interactive game project with high school students where they created Christmas games using ActivInspire.  We modified the assignment for the second semester and based the quiz games on careers.

Here's a list of the parts of the assignment with links to my sample resources.

  • Intro to ActivInspire - I didn't create a file for this.  I just showed the class how to make some basic art.
  • Title and Template Pages - Students were required to create more art and make some pages in ActivInspire.
  • Career Questions - They were required to write10 questions related to their career or career planning in general.
  • Final Game Flipchart - They put everything together into an interactive flipchart for the final step.
The flipcharts are being added here as we upload them.  You'll find examples from the Christmas games there too.

In other flipchart news, my own games are posted on this page at Promethean Planet.  Here are some points to note:
  • My most downloaded game is This or That? and it will likely pass 2,000 downloads this week.  It's a personal milestone. 
  • My Oh, Really! flipcharts have been downloaded over 3,000 times in all.  The original will probably pass 1,000 downloads this week.  Again, the numbers are not as high as many other flipcharts on Promethean Planet, but it is great to know the games have reached many teachers and students.
  • And I posted a Jeopardy flipchart a few weeks back that a friend made.  It contains 17 trivia questions based on Romeo and Juliet.  I helped with some of the technical aspects of setting it up. 
And I was experimenting with Animoto and the pictures I took for this project...

Tuesday, March 20, 2012

Game Design and Ecosystems - Project Overview

I have written plenty about the Game Design and Ecosystems project, but I wanted to have one post that links to everything and sums up the experience.

Andrea Thelen and I agreed that we accomplished a lot with this project.  It was the first time either of us had attempted such a degree of integration.  While I had worked with Gamestar Mechanic before this, I had never taken an entire class through the design process to a multi-level game.  We were happy with the results, but we felt it took a little longer than we'd hoped to complete it.  Also, the standard of the students' work at the end was not as high or as consistent as we would have liked.  The story we hoped they'd develop was not strong, for example, and some students didn't complete all aspects of the project.

I asked Andrea to make a list of things she'd do differently next time and I added a few items of my own.  Here's what we came up with.

  • Assign groups rather than have students choose their own groups
  • Limit group size to two students if at all possible
  • Provide feedback on each stage of the project more quickly, especially on the story elements and the extra components such as the quiz and the playtest assignment
  • Start the Quest at Gamestar Mechanic right at the beginning and be sure the students are progressing in a timely manner
  • Provide more examples of good and bad aspects of game design
One goal of the project was to have younger students play the games and take quizzes to see how well they learned the ecosystem facts from the games.  This did not come together as well as I had hoped.  The younger students' teachers discovered they didn't have enough time to devote to the game and the quizzes.  One classroom did play the games and the students enjoyed them a lot, but only a very few students took the quizzes.  There wasn't enough interesting data collected from those for me to report.

In summary, here are the parts of the project that I wrote about previously.  Resources related to each stage are included in the posts:

Donations are definitely accepted!
Our ecosystem project has been a popular stop for many educators searching for project ideas.  If you find anything here useful, please consider donating $1 to $3.  Any money I receive this way will be used in my district to purchase resources for similar technology projects. We and our students greatly appreciate your support!  We would love to hear how you use the resources too.

Thursday, March 15, 2012

Game Design and Ecosystems - Sample Games

Here are two games that came out of this project.  There were other games worth mentioning, but I am using these two because the groups did the best job of finishing all parts of the project, including the quizzes.  The plan was to give the games and quizzes to some younger students to see if they would learn the content just by playing the games.  We are still waiting on that feedback, but for now, here are the games and quizzes.

The Rainforest Journey


Click here to see the quiz for the above game.

The Producer - Felix's Journey


Click here to see the quiz for the above game.

Monday, February 27, 2012

Game Design and Ecosystems - Storyboards

I based the storyboard portion of our project this lesson by Kevin Hodgson posted at the Gamestar Mechanic Teacher portion of the site.

My prior experience has been that students resist planning the games and that's what Mr. Hodgson stated in the lesson as well. I was pleasantly surprised to see the girls in this class enjoying the storyboarding process. As I reported previously, there were no complaints!

To start the lesson, I showed them the examples from lesson above and I gave them one example I made based specifically on the ecosystem games. I posted these directions and had them get to work:

For each level in your game, make a storyboard. Each one must include:
  • The level number and title
  • Whether it is a top down or platform level
  • An explanation of the goal
  • The types of enemies that the hero will encounter
  • Where the hero starts
  • Where points and the goal marker will be
  • A picture that maps out the entire level
Here are some examples from our class.