Friday, February 11, 2022

Student Created Word Problems in First Grade Math


I worked with LeeAnn Raible recently as part of our Go Beyond Challenge. She had the idea of letting students make word problems using addition and subtraction, then they'd record their solutions with Seesaw. 

I'll embed some of their examples at the end of the poast.

She called the project Number Story Ninjas, and we also connected with another elementary school in our state to get feedback. Giving the students an authentic audience was a fun addition.

Here's the process we went through.

Step 1:  LeeAnn assigned each student a role of Writer, Editor, Graphic Designer and Problem Solver. 

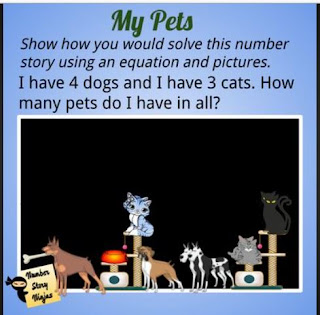
Step 2:  Six Writers each created a simple word problem like the one in the picture. These were written on paper, so no tech was needed.

Step 3:  I met with the class to introduce them to Google Classroom and Google Slides. After that, the Editors typed the Writers' problems into a basic Google Slides template.

Step 4:  I copied their text to a larger Google Slides template that would work with Seesaw. Here's an example of a blank slide. It's 2000 pixels wide, so you really need to make large fonts for them to show up. 

I also added some clip art from Pixabay. Do not let students search that site for pictures, due to some content. It does have plenty of transparent images that work great for this project. I pasted possible images in a second slide, then I added the text, our logo, and the "blackboard" image to the first slide. 

Step 5:  I met with groups of two to four Graphic Designers to help them design the slides using the clip art I provided. No one felt limited by the options I chose, so that was a bonus! Their main task was choosing a title font, background color, then pasting images from the second slide to their template. They got lots of practice using ctrl-c and ctrl-v to copy and paste.

Step 6:  After I saw how they wanted the slides to look, I recreated them in Seesaw. This step was a little more time consuming than I expected, but it wasn't bad once I got the hang of it. In Google Slides, I copied the students' slides, then deleted anything that needed to be moveable. I downloaded the remaining items as a JPEG, then uploaded that to Seesaw for the background. 

I made this video for teachers, showing how I created the activities in Seesaw. Note that I cropped a lot of images from Pixabay when I put them in Google Slides. Seesaw didn't give me that feature (that I could find). So I ended up editing some Pixabay images in another program, before uploading them to Seesaw as the video shows.

Here are some examples the Seesaw activities we used:

Step 7:  We assigned those activities in Seesaw. LeeAnn's students were already very familiar with recording using Seesaw on iPads, so the tech part of this was easy. I met with groups in a quiet part of the school to help with recording. 

It took some coaching to get them to go through the problems in a way that would make sense to a viewer. You'll see the directions also asked them to show it with an equation and with the pictures.

I did take about 90 minutes to edit all six videos. There were minor distractions, some mistakes and some prompts from me or other students as they worked.

I remembered at this stage of the project that Liz Kolb (in her Triple E Framework) suggests co-use of devices as a research based practice, to improve engagement with the content. So I had two students work together on some problems and I could see the benefits right away.

Here are a couple examples of the finished product. I think they turned out great! When we use the project again, we agreed we will use more complex math problems. 

Two students working together on one iPad, performing an addition problem:


A subtraction problem:


Sunday, January 2, 2022

Inspiring Reading and Writing With an Authentic Audience - Part 3

In this third post about this project, I'll list some resources and focus on the final steps we go through to complete the digital products. I'll conclude with a bit about the challenges we faced to bring it together. If you want to read about the background, including why I think this lesson is so valuable, see Part 1 and Part 2.
 

The Planning Sheet

Once students were given the younger students' responses from the survey, we gave them a printed copy of this planning sheet. I added the planning sheet this year, since we had seen students struggle with it in the past. Here's a breakdown of the planning sheet:
  • The first seven questions ask them to simply copy down what their assigned 5th grade student had submitted on their survey. That is meant to just ensure the writer read the younger student's information.
  • The next few questions take them through the process of connecting those ideas (which are sometimes very unconnected) into a simple story. Some students had trouble with this, but I was impressed how imaginative they could get with just a little prompting.
  • The last question asks them to outline the story. I assured them nothing was written in stone here, but it was important to make a plan.
I and the teacher worked with students individually to get through the outline process.

My plan was to have them start typing the story after the outline was done, but the teacher wanted a first draft to be written in their notebooks. I can see this group benefitted from that, so you can decide if a handwritten draft will be better than moving right to the digital part.

Making the Digital Booklets

I refer to these as digital books, but we just build them in Google Slides. I assign this template in Google Classroom, so that they each get a copy. It has two sections on each slide, so there's a place for text and a photo, like this.


Note that the first slide of the template has a place for a title page. I don't like them to take time making that at first, so the directions (typed on the slide itself) ask them to come back to that after they've completed a few slides. I provide these examples of cover images. Normally I encourage them to use Word Art, drop shadows and a good layout. See below about some challenges we faced this time around. Eye-catching title pages were not our main concern this year!

Preparing the Files

After students work through some drafts and revisions, they submit the stories in Google Classroom. I make a copy of each one and move the copies into a new folder in Google Drive. That way the teacher can grade the originals as normal, but I can polish up the copies so they're ready for the younger readers. 

The amount it takes to "polish them up" varies quite a bit from student to student. Most times it involves some punctuation corrections and some wording changes. Over the years I've had to rewrite some or nearly all of some stories for various reasons. For example, one time a younger student stated her problem as, "Sleeping through scary nightmares." The older student tried to provide a situation about overcoming fear that, even after her revisions, would have been too intense for the young student. I get input from both teachers involved, in some cases, just to be sure sensitive cases are handled appropriately.

I also rename the file so it includes the younger student's chosen nickname. That's so they can easily identify their story, depending on how they are given to the readers.

On that note, I prefer to download PDFs of each Slides presentation, then upload them to Drive. When I have a lot of time, I then build a Google Site and link to each story. This was not a year where I could do that in a timely manner, so I just sent the 5th grade teacher the link to my Google Drive folder with all the presentations. She shared that link with her class. 

Finished Examples

This first example is a very direct imagining of a situation based on what the younger student had stated in the survey. Here's what the 5th grader submitted

Here's the final story written by the 6th grader. I really appreciated this student's concern to include so many references to the younger student's responses in his simple story. 

The second example is one of the longer stories we received. There's a lot I like about this 6th grader's writing, but the detail overshadows some of the main theme of overcoming obstacles to achieve a goal. The writer's desire to address the younger student's responses is still very evident, though, and that's one of my favorite things about this project. Here are the 5th grader's responses:

Conclusions

The additional scaffolds we provided (through question sheets) helped a lot this time around. The 5th grade teacher didn't know much about this project when I first asked if we could use her class as our audience. She was more and more impressed with it as we went along. She said her students loved getting the stories. It was a success in many ways, and I look forward to trying it again in the upcoming semester. 

I do want to address some challenges we faced in bringing it together this time. The project started as strong as ever, but a couple days into it we had several students out due to quarantines. Since every student had to write for a younger student, this activity really needs 100% involvement to come together well. For several days only half the writers were in class! Getting the ones to work on it diligently from home was a huge challenge. Even a couple students who were in class most days were resistant to writing. This was the first time some students did not care to write for younger students. We are sure this was due to the effect the absences were having on the students in general. All their classes throughout the day were impacted by it, so by our 6th period class, productivity was way down. The teacher and I almost decided to forget the project and try again next semester. 

It ended up taking several days longer than usual, so I was not in the classroom with them the final week or two. The teacher had students help each other to complete some stories. We never did get a workable story from those two tough cases. It was unfortunate, but given the situation, we focused on what we did accomplish. Two other students volunteered to write those missing stories. Their extra work and concern for the young readers was great to see!

Friday, December 31, 2021

Inspiring Reading and Writing With an Authentic Audience - Part 2

This post is Part 2 of a three-part series. Click here to see Part 1 and Part 3.
We did this project as part of the Go Beyond Challenge I took on, along with some teachers I work with. See Part 1 of this project for some more background. In that part, I also explained how I started it off with a group of elementary students (who acted as the authentic audience).

This second stage of the project doesn't require any technology use from the students. In it, I introduce some concepts about making good stories. I also share three powerful examples of people who overcame challenges in life.

This took just over one class period this time. I met with the older students (6th graders, this year) to introduce our working definition for a good story. As an aside, we normally try to get 7th graders writing for 3rd graders, to increase the difference in ages. As I'm sure all teachers understand, there have been many obstacles this year! We were glad to have a 5th grade teacher express interest in having her students be the audience. And due to scheduling decisions, the Learning Through Literature class happened to be a 6th grade class this time around. 

As I mentioned in Part 1, these students had been the readers in this project three years ago. They had a good idea of what the end result of this would be. The teacher and I decided we needed to sharpen the focus on this part of the process, though, so I assured the class we made some changes. I always like to present a project as something new we are trying. Students generally like to be a part of learning along with the teachers.

I showed a few slides and talked them through these points:

  1. I start with several of the slides I showed the younger students just a day before. I address how technology can open doors, how they have gifts for helping others, and how we all face obstacles in life that we need to overcome. I remind them of my personal stories. Of course, we talk as if this is all for the younger students, but I'm hoping to hook some of them with the message as well.
  2. I show them the questions I asked the younger students. I don't share any of their responses yet, but I explain that those answers will be given to them the next day.
  3. I also be sure to include a photo that I took of the younger students, as they filled out the survey. Of course, seeing their faces is a key part of the motivation for this project. They will be writing for real students who need to hear the message.
  4. I introduce our definition of a good story:  A character who wants something, and overcomes obstacles to get it
  5. We take some time to discuss where we see this pattern in our favorite books and movies.
  6. I ask them to read one of three short biographies I compiled. I tell them these people were selected because they overcame challenges, then went on to help others. These are all inspiring stories to me that I enjoy sharing with them with the class. I certainly prefer a true story to fiction. The links below will take you to the documents I use (which cite the sources I pulled them from). I give them printed copies rather than having them get Chromebooks out for this.
    1. Ben Carson - Raised in poverty by his single mother, Carson faced great challenges in school. Everything turned around when he realized how much he could learn by reading.
    2. Phiona Mutesi - This story was made popular by the book and Disney movie, The Queen of Katwe. Phiona rose from extreme poverty when she discovered the game of Chess and quickly exceled at it.
    3. Helen Keller - This is a familiar story for most of us, but the students usually do not know it. The biography highlights the moment she remembers the word "water" and suddenly the world takes on meaning.
  7. After they finish the biographies, we put them in groups of three students who read the same biography. I give them a sheet of simple questions they can use to sum up the key parts of the person's story. (We used to have them just summarize what they read, but they had trouble focusing on the aspects relevant to this project.) The question sheet for each biograph is in this document.
  8. We then have each groups report out their answers, so everyone can hear the key points for each person. 
  9. This year we also shared this reading of Emmanuel's Dream, a children's book about one more person who overcame great obstacles to help others.
 As always, the students were very much into the project by the end of this part of the activity. In the final post, I'll talk about how we started making the stories and I'll share some final examples. 

Thursday, December 30, 2021

Inspiring Reading and Writing With an Authentic Audience - Part 1

This is Part 1 of a three-part post. Click here to see Part 2 and Part 3.

Nicole Fazio is a middle school ELA teacher in our district. I teamed up with her for my Go Beyond Challenge, completing a project for her 6th grade Learning Through Literature class. We decided to improve upon a writing project we've done a couple times in in the past. It's a powerful activity, getting to the heart of what school, and maybe even our life stories, is really about.

It has multiple stages, so I'll break it down into manageable posts and share related resources in each.

The overall goal is to have older students write stories for younger students. The project accomplishes these goals:

  • It gives younger students a story to read that they are personally interested in.
  • Older students know someone is expecting a story from them, so they are generally very motivated.
  • The entire project is focused on an important life lesson that every student can benefit from.

We know this is a memorable activity for students, since this year our older group remembered the stories that were written for them when they were third graders. It was very encouraging to hear that! 

As for that important life lesson I referred to, we use Donald Miller's definition of "story". He says a story is a person who wants something and overcomes obstacles to get it. Here's how we use that in Part 1 of the project.

Introducing the Project to the Younger Students

I meet for about 15 - 20 minutes with the younger class as the first step in this process. Getting this opportunity, and sharing an opportunity with the class through it, is a highlight of my school year. This time it was a 5th grade group. I take them through a short presentation that covers this outline.

  1. I remind them of my role in the district (Instructional Tech) and how excited I am to see technology opening doors of opportunity for students.
  2. I tell them we are always working to improve an experimental project, and we need their help. It will involve older students writing stories for them.
  3. I share one example of a former student who followed her dream of writing. We featured her in a video a few years ago, so I have pictures of her working on her computer. There are always a few students who are familiar with her story, since this student's mother teaches in the district.
  4. I tell students that they all have gifts that they can use to help others. That's what school is about--discovering and using those gifts.
  5. I also talk about challenges we have to deal with. I get personal, with some examples of why I was afraid to go into teaching at one time. I share how my wife overcame abuse, eventually becoming a caring person who has been honored for her volunteer work. This gets pretty serious, but believe me, the class is with me at this point. (The ones who thought I was just the tech guy who fixed Chromebooks are usually surprised by my passion for learning and success.)
  6. At that point, I introduce a short survey they will fill out, so older students will have something to write about.

The Survey

I created this survey as a Google Form, but you could do it on paper fairly easily. Below are the questions I ask. This is a trimmed down list from what we used in the past, since we were trying to sharpen the focus for the writers in the next stage.

  1. Are you a boy or girl?
  2. What name would you like to have in the story? Think of a nickname instead of your real name.
  3. Who lives with you? (Please don't use names, just say things like, "My mom, 2 brothers and my grandma.") 
  4. What is your favorite activity when you have free time?
  5. What kind of stories do you like? You can pick more than one.
    • Exciting
    • Funny
    • Mystery
    • Spooky
    • Happy
    • Silly
  6. What is your gift that you could use to help other people? (If you aren't sure, you can write down a gift you'd like to use to help others.)
  7. What is one challenge or "wall" in your life that's hard?
Notice that we do not let them use their real names. I collect their Google account usernames with the Form, so I know who wrote each one. If you use a paper survey, I suggest having students identify themselves by a number. It's important for privacy that the older students have no way of knowing who the student is they're writing for.

The classroom teacher and I work with students if they have questions as they complete the survey. Afterward, I go through the responses and refer any to the teacher if they deal with serious issues. As you can imagine, students are open and some are facing very difficult challenges in life. I usually have to reword a few of them, so it doesn't seem to daunting for the older students who will be writing for them.

I use Autocrat to compile the responses into the format you see below. Those will be printed and handed out to the writers.

Continuing the Project and Thoughts on Learning

I'll explain how we kick this off for the older students in my next post. For now, I will just say this project started out amazing this time around. Then it turned into a bit of a nightmare! I almost abandoned it, with hopes of trying again in the next semester. A rise in quarantines and other issues in the district made it clear we were nowhere near "back to normal". Pushing through challenges was the theme of this project and very much our experience with it.

On that note, I want to return to the message I shared with the 5th graders:  They have a gift they need to use, and they'll have to overcome challenges to do it. I really believe that's the message we need to be telling students. It's what we have to help them do in our classes. Somehow school becomes way too much about standards. Maybe teachers would say that they know it's about the kids and their success, but I wonder if that's the message our students hear. 

Sure, there's an emphasis now on relationships. "They won't care how much we know until...." But what do we mean by relationships? Too often it looks like we're just trying to be everyone's friend. I suggest it's about getting close enough to our students to build trust, and knowing them enough to speak about their gifts and challenges. Students need to see school as being about their lives. Particularly, how it helps them identify strengths and succeed despite their obstacles.

That can make learning an exciting story they'll want to share.

Wednesday, December 29, 2021

Game Design Project in Mythology Class

Melinda Newcombe teaches the Mythology class at our high school. We teamed up earlier in the month as part of the Go Beyond Challenge I raised to myself and several teachers this school year.

In this overview, I'll link to a couple games that students made in this Mythology game design project. I'll also explain what we learned and give links to resources. 

Key Challenge to Remember:  The course content has to be the goal. If the students are thinking and talking about the content, it's a win no matter how the games turn out. 

We considered this project a big success in a lot of ways. It is a unique blend of content, game creation, collaboration and technology. Students and the teachers really enjoyed it throughout. I know from experience, though, that it can be overwhelming to take on the first time. This is not just a PDF download that you print and hand out. I'll list some tips at the end for anyone considering it.

My key takeaway: Working with this class convinced me this is a great project for a group of students who are interested in making a game. While it worked very well for us with a whole class, that brings a lot of obstacles you won't want to tackle until you've gone through the process a few times.

Overview

I put a lot of information about the game design project in general on my Game Design Project Packs site. Keep that link handy in case you want to use this someday. It provides a number of simple game options that the students can redesign based on the lesson content.  

We worked on the project for six class periods.

The overall process is:

  • Learn to play what I call the "base games". These are games that will be new to almost all the students. They are easy to learn and they don't require a ton of printed materials. Don't underestimate how important those things are. It took a lot of work to find good games that fit that criteria. Since the games are not about the course content, I try to make sure the students learn them and play them in just one class period.
  • Students then complete some planning sheets that help them think about how they will add a theme to the base games. This is vitally important, since it's when students apply the lesson content to the game. For example, if the base game uses chips as points, the planning sheet will ask them to think about what the chips represent from the lesson content. Here's the planning sheet we used for groups that redesigned Love Letter. 
  • Next, students edit the templates I provide for the cards in the various games. All templates are in Google Slides, so the tech is not a huge obstacle. Students can easily do a superficial change, by just making the cards be about their lesson content. If time allows, though, you can dig deeper into game design here, asking them to make changes to the effects of cards and the rules of the game. (Templates are found on my Project Pack site. I'll add more soon.)
  • When the templates are finished, it's time to print them, cut them out and see how well they work. Through playing them with other groups, students get a good review of the lesson material. It also lets them see the importance of testing and revision in game design (or any design for that matter). If there's time, you can repeat the previous step and this one, allowing them to improve the games.
  • At the end, I have students do a reflection sheet that seals the learning. I ask about what they learned from the content, how they tied it into their games, and what they learned about game design. I also get feedback from them about the project itself, so I can do better next time.

Example Games Created by Students

Here are two different games students created as part of this project. They are two of the five different styles of games we offered. I made a few edits to clean up these files, but the majority of work was from students.

What We Did Differently This Time and What I Learned

As I said, this is the first time I worked with a large class and gave them the option of choosing from several games. I presented many options for them for the first day, as they learned the base games. Among all the groups, they chose to learn four different ones. 

Teaching that many new games to six or seven groups in 40 minutes (and giving them time to play) is a huge task. I've used games in class for 25 years, so I know how to teach them quickly and effectively. You'll make your life easier if you pick one game everyone has to redesign

Two of the base games I taught that day--including one that got the most repeated play--are not posted online yet. I will add them to the list on my Project Packs site soon. 

I will also add a section to my site for Mythology class projects specifically. There I'll post all the planning sheets, templates and reflection sheets we used. (The ones there now are generic, so teachers can adapt them to any subject or lesson.)

Two groups decided to branch out and make a game completely different from those I presented. What they proposed fit my criteria (not much to print, easy to learn, etc.), so I encouraged it. Remember that only had about 2.5 class periods to actually make the game content. You can probably guess what happened with both of these groups' game ideas. They had fun working on them, but they didn't get far in that little time. 

In fact, feedback from many students was that they needed more time. Students could stretch a project like this out for weeks, and if you're teaching game design you would need that long. All things considered, though, the teacher and I decided the goal was met and it was time to move on.

One big change I'd make was to focus more on learning standards as I met and planned this with the teacher. It was not a loss, but I could have done better in that area. The teacher told me she was really glad to hear the review taking place as students tested their games. There was conversation throughout about various myths and personalities. Once I read over everyone's reflections, though, I realized review was the most they got from it. With more planning, we could have achieved deeper learning goals.

Summary of Tips for Success:

  • Keep content the goal. Remind students of that. Games might not work as intended. Art and fonts might look terrible. Many groups won't completely finish their game. If students were talking about and thinking about the content in new ways, your goal was achieved. 
  • If students feel they don't have enough time or their game isn't going as planned, remind them they can always work on it as a personal project. Here are some posts that include a lot of tips for students who are interested in making games.
  • These game design projects could fit in any subject, but they work best if you just finished a story or you've studied a historical period. Language Arts and Social Studies classes are easiest to start with.
  • If you care about proper use of digital resources, provide a list of sites students can use for free images. I include that on their planning sheets. (See my Love Letter Planning Sheet as an example of sites I listed.)
  • Let a motivated small group go through a Project Pack first, then decide if you want to try it with more groups or a whole class.
  • Choose the game they will redesign, rather than just throwing several options at them.
  • Contact me if you have questions. I can provide a lot more examples and resources than what I have here or on my other site.