
I'll embed some of their examples at the end of the poast.
She called the project Number Story Ninjas, and we also connected with another elementary school in our state to get feedback. Giving the students an authentic audience was a fun addition.
Here's the process we went through.
Step 1: LeeAnn assigned each student a role of Writer, Editor, Graphic Designer and Problem Solver.
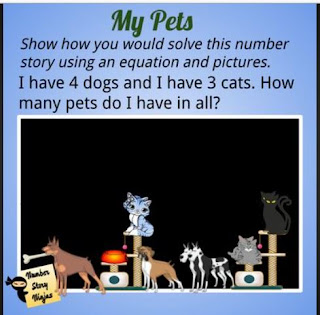
Step 2: Six Writers each created a simple word problem like the one in the picture. These were written on paper, so no tech was needed.
Step 3: I met with the class to introduce them to Google Classroom and Google Slides. After that, the Editors typed the Writers' problems into a basic Google Slides template.
Step 4: I copied their text to a larger Google Slides template that would work with Seesaw. Here's an example of a blank slide. It's 2000 pixels wide, so you really need to make large fonts for them to show up.
I also added some clip art from Pixabay. Do not let students search that site for pictures, due to some content. It does have plenty of transparent images that work great for this project. I pasted possible images in a second slide, then I added the text, our logo, and the "blackboard" image to the first slide.
Step 5: I met with groups of two to four Graphic Designers to help them design the slides using the clip art I provided. No one felt limited by the options I chose, so that was a bonus! Their main task was choosing a title font, background color, then pasting images from the second slide to their template. They got lots of practice using ctrl-c and ctrl-v to copy and paste.
Step 6: After I saw how they wanted the slides to look, I recreated them in Seesaw. This step was a little more time consuming than I expected, but it wasn't bad once I got the hang of it. In Google Slides, I copied the students' slides, then deleted anything that needed to be moveable. I downloaded the remaining items as a JPEG, then uploaded that to Seesaw for the background.
I made this video for teachers, showing how I created the activities in Seesaw. Note that I cropped a lot of images from Pixabay when I put them in Google Slides. Seesaw didn't give me that feature (that I could find). So I ended up editing some Pixabay images in another program, before uploading them to Seesaw as the video shows.
Here are some examples the Seesaw activities we used:
Step 7: We assigned those activities in Seesaw. LeeAnn's students were already very familiar with recording using Seesaw on iPads, so the tech part of this was easy. I met with groups in a quiet part of the school to help with recording.
It took some coaching to get them to go through the problems in a way that would make sense to a viewer. You'll see the directions also asked them to show it with an equation and with the pictures.
I did take about 90 minutes to edit all six videos. There were minor distractions, some mistakes and some prompts from me or other students as they worked.
I remembered at this stage of the project that Liz Kolb (in her Triple E Framework) suggests co-use of devices as a research based practice, to improve engagement with the content. So I had two students work together on some problems and I could see the benefits right away.
Here are a couple examples of the finished product. I think they turned out great! When we use the project again, we agreed we will use more complex math problems.
Two students working together on one iPad, performing an addition problem:
A subtraction problem:
No comments:
Post a Comment